Add a new template
Begin a new template by clicking + Add Template. Then, fill out the pop-up shown below and click Save to continue.
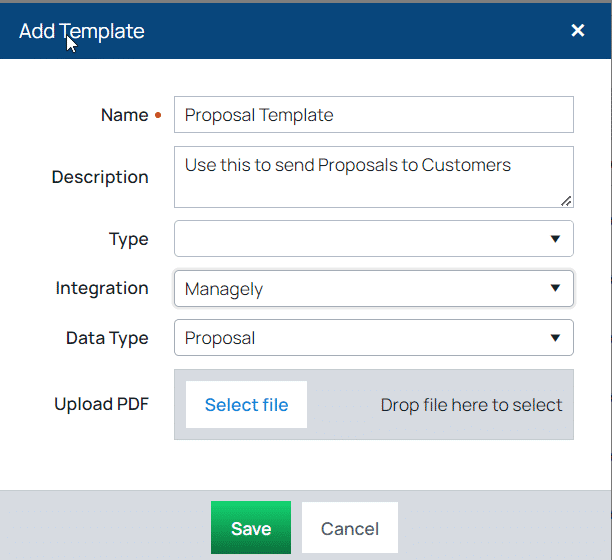
Name: Enter a title for the template here.
Description: Enter information about the template like what it's used for.
Type: This categorization is set at Setup > Other > Template Types to help you organize your templates.
Integration: This is where you choose which database to use in the template. Currently, Managely is the only one available.
Data Type: This lists the categories of data types available in the Managely Database. If you choose incorrectly, you will need to delete and start over.
Upload PDF: This allows you to upload a PDF of a paper form you already use as a background for the eForm.
Parts of the Design Screen

| Tools | These tools will add blocks to the form. To use them, click and drag the name of the tool to where you want the part to be on the form.
|
| Shared Data | This section contains auto-fill fields and pre-formatted blocks from parts of Managely that can be added to the form. Use the Edit Columns Button in the Properties Column on the right side of the screen to choose the columns for the shared data parts. Unformatted fields can also be added using the Text Tool. |
| Form Data | These are the blocks that were selected in the tools to be filled out by the recipient of the form. They will need to be assigned before sending by email. The Add Field button allows you to create your own Form Data Field, but it will not be connected to other fields in Managely. It is typically used when an editable field is needed by either the sender or recipient and you can select if it is required for the sender or recipient to complete this field. |
| Collapse Tools | This closes the left column that has the design tools and fields. |
| Edit Example Data | This allows you to change which proposal, contract, etc. that is being used for the preview. |
| Preview | This downloads a PDF example of your design. |
| Save | This saves your designed eForm. |
| Cancel | This button removes your unsaved design. |
| Collapse Properties | This closes the column on the right side used to add detail. |
| PropertiesColumn | This column allows you to change the colors, sizes, etc. of the fields when they are placed on a form. For the commonly used Text tool, click the Edit Button to add text and auto-fill fields with Managely data. |